Two sisters cooking and creating...and neglecting laundry. Welcome to our slice of the internet!

Wednesday, March 30, 2011

Hadden's 1st Birthday

One of my new years resolutions was to have a fun celebration when Hadden turned one. Kids only turn one once, so celebrate we did! My favorite part of the night, of course, was us all singing "Happy Birthday" and watching our little Hadden Sky dig into her cake. I was looking forward to that part all day while I was blowing up balloons, prepping food, and hanging streamers. We served mini sirloin burgers (of course) and hot dogs with all the fixings. Everything came together and was perfect in spite of my layer cake cracking cause the layers were too thin right before the party was about to start. Thank goodness my mom and Kara brought back ups and saved my bacon. Thanks for everyones help in making it the perfect night. I have the best family and friends in the whole world! Here are some pictures:
I know this pic is blurrry...I was really struggling with my camera settings in the beginning.
Dessert table: cupcakes, doughns, rice krispie treat lollies, and Hadden's itty bitty layer cake. The balloon chandelier/fixture/jumble, I'll talk about in another post where I can blab more about the details and share some more pictures.
Fresh cut cucumber, red bell pepper and carrot dunked in Buttermilk Ranch Dip. Originally saw this idea on Pinterest...I need to head over there and share the original source, post edit.
Izze's make a party a par-tay.
Party people.
Blurry hovering hand.
The moment of truth.


Success.

Thanks for letting me share these pictures. Hope you're all having a good hump day!

images by Kara and Briana

Sunday, March 27, 2011

Toasted French Dip w/ Caramelized Onions & Melty Swiss Cheese

Juicy and flavorful roast beef, caramelized sweet onions and smooth and melted swiss cheese, all packed on a warm and toasty hoagie bun!  This, my friends, is what we had for Sunday dinner!  And boy was it GOOD!!!!
Ingredients:
3 lb chuck or rump roast, salt & pepper each side and brown in fry pan.  Then place in your crock pot on high heat.
Add:
2 cups beef stock (I like to use Kitchen Basics)
1 medium white onion, sliced
Cover crock pot and let cook on high heat for 4-5 hrs.
When meat is ready to come out of crock pot, begin prepping caramelized onions.
In a saute pan, on medium/high heat add:
1-2 tablespoons butter
1 sweet yellow onion, sliced
1/2 cup au jus (beef stock) from the cooked roast in the crock pot
Allow the onions to get tender and the juices to reduce to a thick caramel like sauce on onions.  This will take about 10 minutes.

Slice your buns through horizontally and lay sliced side up on a cookie sheet.  Put slices of swiss cheese on the top layer of each bun.  Then into the oven on low/broil.

Take your roast out of the crock pot and begin shredding the meat with a knife and fork, discarding any fat along the way.  Use the leftover cooking juices in the crock pot as the dipping au jus for you French dip sandwiches!  Take toasted buns out of the oven and begin assembling your French dip sandwiches with the shredded beef and caramelized onions!  Cut each assembled sandwich down the center on a bias.  This just makes the sandwiches easier to dip and eat!  Then Enjoy!  I know my little family sure did!!!!


Friday, March 25, 2011

Ground Turkey Tostadas

It's snowing at my house right this minute. Boohoo. But, that's not gonna get us down! We've got errands to run for my little Hadden's 1st Birthday. She turns one on Monday! It's going to be a fun little celebration. I'll post pics from it next week sometime. Have a lovely weekend and I hope it's not snowing at your house! Here's a recipe to take you into the weekend:
Ground turkey is really versatile and a healthier alternative to other ground proteins. I like to use it in tacos or tostadas. This filling is flavorful and juicy. You'll have dinner on the table in 20 minutes tops and you'll love watching your family wolf these down. Enjoy!

Recipe (Yield 4-6 servings):

1 package ground turkey 1.25 lb-1.50 lbs (find one that has no added hormones or fillers, preferably--most are this way already)
1 medium size white onion, finely chopped
1 8 oz can tomato sauce
1 package taco seasoning (I like Mckormick because it has no MSG and the ingredient list is pretty much all spices)
1/3-1/2 cup water
2 tbs olive oil

In a large skillet, heat the olive oil over medium heat. Add chopped onions and allow to soften for a few minutes. Add ground turkey to onions and brown while stirring and breaking the meat up. Try your best to break big chunks up as best you can, it may take a little effort. When meat is cooked through and broken up into smallish pieces, add taco seasoning packet, tomato sauce and water (start with a 1/3 cup and add more if you feel it needs it). Stir to combine and coat. Allow to simmer for a couple more minutes to let liquids reduce. Serve.

Side note: I like to heat the tostadas and taco shells in a 200 degree oven while I'm making the turkey filling. Pull them out when the filling is finished and then build them how you prefer. Lettuce, tomato and sour cream are a must at our house. I had some of my homemade refried beans in the fridge so I re-heated them and smeared a thin layer on the tostada then built up from there.

image by Briana

Wednesday, March 23, 2011

Creamy Oreo Trifle

I whipped up this dessert a few weeks ago when we had family over for dinner!  Rich and creamy and totally decadent!  It's the "darker" side of the usual berries and white chocolate pudding trifle that I make thru the summer months!  Layers of creamy chocolate pudding, crushed oreos and topped with lightly sweetened whipped cream!!!  So easy to make and in the fridge for just an hour, the oreos begin to get soft and cake like!  This is a winner!!!!


Ingredients:
2  16.6 oz packages Oreo cookies, coarsely crushed
2  5.9 oz boxes Jello chocolate pudding, mixed with 
5 1/2 - 6 cups whole milk
1 pint heavy whipping cream whipped with
3 tablespoons sugar


In an 8 or 9 in round trifle dish, layer Oreos then pudding.  I was able to get 6-7 layers!  Top with the slightly sweetened whipped cream and sprinkle the top with a little grated chocolate bar if desired!  Put in the fridge for at least an hour before serving!


Variation:  For a lighter, more milk chocolate flavor, use 1 box chocolate pudding and 1 box vanilla pudding instead of 2 chocolate!  Also very delicious, and for those that prefer their chocolate desserts not quite as decadent!:)


image by Kara 

Monday, March 21, 2011

Cheesy Broccoli and Rice Casserole

Happy Monday to you!
This (above) completely threw me for a loop. Lily is usually pretty good about eating whatever I put in front of her, but lately she's had more of an opinion. She had two helpings of this Cheesy Broccoli Rice Casserole for dinner and then we reheated the left-overs for lunch the next day. I took this picture after I caught her scraping the scraps from the casserole dish. Here's to hoping your three year old likes this as much as mine did!!
Lily's devouring aside, this REALLY is a delicious casserole that has a sharp cheddar bite and fresh broccoli flavor. The recipe is from America's Test Kitchen and it's one of their Best of 2010 recipes. It's definitely a keeper. Enjoy!

1 1/4 cup Progresso Plain Bread Crumbs (the original recipe calls for two slices of good quality sandwich bread that you pulverize in a food processor-- I opted for Progresso bread crumbs for ease)
1 1/2 oz Parmesan cheese, grated (about 3/4 cup)
6 tablespoons unsalted butter, melted
1 garlic clove, minced
1 large bunch broccoli (about 2 pounds), florets cut into 1-inch pieces, stems trimmed and chopped
1 onion, very finely diced
1 1/4 cup long-grain white rice
4 cups low-sodium chicken broth
1 1/4 cups half &half
1 teaspoon salt
8 oz extra-sharp cheddar cheese, shredded (about 2 cups)
1/2 teaspoon cayenne pepper

Adjust oven rack to the middle position. Preheat oven to 400 degrees. Grease a 9x13 in baking dish. In a small bowl combine 4 tablespoons (the other two tablespoons will be used later) butter, parmesan cheese, bread crumbs and minced garlic. Set aside.

Place the broccoli florets in a large microwave safe bowl, cover tightly with plastic wrap and cook on high until bright green and tender, 2-4 minutes; set aside.

Melt remaining 2 tablespoons butter in a x-large skillet over medium heat. Add the onion and broccoli stems and cook until softened, about 8-10 minutes. Add the rice and cook, stirring constantly, until translucent, about 1-2 minutes. Stir in the broth, half & half, and salt. Bring to a boil. Reduce heat to medium-low and cook, stirring often, until the rice is tender, 20-25 minutes.

Turn the heat off, stir in cheddar, cayenne, remaining 1/2 cup Parmesan, and the broccoli florets.

Pour the mixture into the prepared baking dish. Top with bread crumb topping. Bake until the sauce is bubbling around the edges and the top is golden brown, about 15 minutes. Cool for 5 minutes and serve. (The filling can be prepared, placed in the grease baking dish, covered and refrigerated up to 1 day. Refrigerate the bread crumb topping separately. Bring the filling to room temp. before adding the bread crumbs and baking as directed.)

images by Briana

Thursday, March 17, 2011

For Japan With Love

forjapanwithlove_blog1

Participating in this tomorrow. They are raising money for shelter and emergency supplies for Japan. Go HERE for more information. It's truly amazing.

See you all back here on Monday!

Wednesday, March 16, 2011

Taco Stacks

I've been in an improvising kind of mood lately!  Wanting to try using the same types of ingredients I always use but in different ways!  So the other night I decided to make tacos a little different or perhaps more interesting than the norm!  Tacos will always be a family favorite at my house but it sure is fun to mix it up a bit!  Enjoy!

The how to of it:
Preheat oven to 350 degrees
Take 24 corn tortillas and with a large drinking glass or round cookie cutter as your template, cut them into smaller circles!  I did this more to make them smaller and more fun for my kiddos!  But you can always keep the tortillas the size they come and just do two layers instead of three!

Next:
Brown 2-2 1/2 lbs lean ground beef (drain fat)
To the browned beef add:
1 tablespoon salt
1 tablespoon chili powder
1/2 teaspoon paprika
1/2 teaspoon cumin
2 teaspoons dry minced onion (love the flavor)
Of course you can use a taco seasoning packet.  I just prefer the flavor of adding my own seasonings!

Next for spicy sour cream:
Mix 1 cup sour cream
1 teaspoon salt
1 teaspoon chili powder
1/4 teaspoon paprika
1/2 teaspoon cumin

Grate 2 cups cheddar cheese and assemble taco stacks!  Repeat layers 3 times!


Notes:
Cover your pan with foil and into the oven for 20 minutes!
This recipe will easily make 8 three layer stacks!

images by Kara


Pinterest

Hey, friends! Do you do Pinterest too? Let's follow each other! Follow my boards HERE. If you don't have a Pinterest account, sign up and get one. It's the perfect way to organize inspiration and what not.

Isn't this teardrop trailer amazing? It's one of my pins. It's got me all weak in the knees and longing for spring and summer.

Tuesday, March 15, 2011

Japan


All the tsunami footage is heart wrenching. My mouth just hangs open in disbelief. Those are huge cargo containers pictured....each of those individual containers surely weighs tons.

I've been anxious to find ways to help and want to share these two places that you can go to donate: HERE and HERE. I trust them completely. Where are some other places you are going to donate? I'd love to hear.

Thanks!

image from National Geographic

Monday, March 14, 2011

Hash House

Well, we just got back from an excellent weekend down in Vegas for the Mountain West Conference Championships!  The guys were able to go to the games while us girls stayed with the kiddos, shopping and occasionally trying to find a restaurant/bar that would be showing the games since our hotel didn't have the right channel!  BOO!  But no complaints, we had a great time!  And the grand finale came in way of a famous little breakfast joint called the Hash House!  Bri has been to this place before and mentioned we should really try to make it for bfast on our way back home!  Let me start by saying, "the hour and a half wait, with small hungry kids???  TOTALLY WORTH IT!!!"  The food was inventive, creative and so delicious!  And the portion sizes??!  Our eyes about popped out of our heads!  This place will be a Vegas tradition from now on!!!


Baby Hadden with her "kids" sized caramelized banana/pecan french toast!
Some of the gang!


Breakfast quesadilla stuffed with griddled mashed taters, eggs, cheese and veggies!  I didn't know tortillas that big existed!  
This picture does not even do this caramelized banana pancake's size justice!  It was as big as a pizza!   
The corned beef hash came out in a huge iron skillet!!
One of their benedicts!
Leftovers anyone??  Too bad we were traveling!

By the way, sorry about the less than stellar images here!  I was in a hurry to take pics so I could devour my own breakfast! 

images by Kara
  

Thursday, March 10, 2011

Homemade Frijoles Refritos


After making and these refried beans, I am going to try my hardest to never eat pasty refried beans from a can again. That sounds dramatic, but I'm serious. They were so delicious and made me realize just how bad I've been missing out. You do have to put a little effort into making these: you've got to soak the dried beans, then cook them, and then cook them again (according to the package instructions). But it's definitely worth the extra effort. There isn't any lard in them either, which is a huge plus. Enjoy!

Recipe (10-12 servings):

1 lb bag dry pinto beans, prepped, presoaked and cooked (according to package instructions)
1 white onion, diced and sauteed till soft
1/2 cup - 1 cup water, divided
1-1/2 tablespoons olive oil
1-1 1/2 teaspoons salt
1/4 teaspoon black pepper
1/4-1/8 teaspoon cumin

In a large skillet, combine beans, 1/2 cup of your water and sauteed onion. Turn heat to medium. Using a potato masher, mash beans into a rough puree as everything heats. As the bean mixture cooks a lot of the moisture will cook off, so don't be afraid to add a little more water if you feel like the mixture is getting to pasty and dry (you can make them as thin or thick as you want). Before serving, stir in salt, pepper and cumin.

Few things can satisfy like a good ol' bean and cheese burrito can. Let me show you how I make mine:
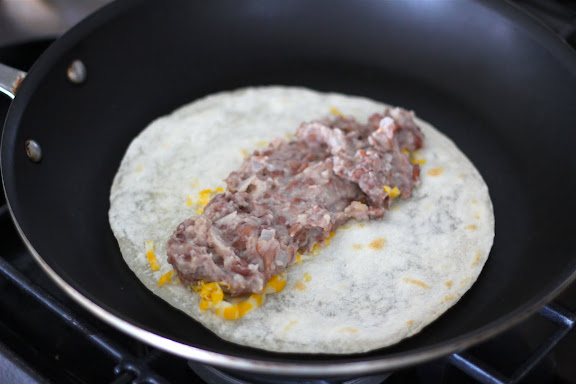
I start with uncooked tortillas. You can find them at your grocery store (try to buy ones that are made with canola oil vs. lard....seems like the lesser of the two evils). After you've cooked one side, flip it over and sprinkle a line of shredded cheese down the middle. As the other side of the tortilla cooks, the cheese will begin to melt.
Spoon refried beans (I have them getting hot in a separate skillet) over the melting shredded cheese.
On top of the beans drizzle some red or green sauce. The sauce pictured is Taco Bell Mild sauce in the bottle. I know, it's nothing gourmet; but I happen to dig the flavor and it's quick and easily accessible. I also love La Victoria green sauce on bean and cheese burritos as well.
Slide the tortilla onto a plate.
Wrap it up....
and wolf it down. The cheese will be melted and gooey and the beans and sauce will be hot, just as it all should be.

images by Briana

Monday, March 7, 2011

Meatballs:)


I have to be real honest.  Meatballs kinda gross me out!  Like, I would never go to an Italian restaurant and choose the "meatballs" on the menu!  If we get down to the nitty gritty, I'm all around a finicky farmer when it comes to meat!  Period!  Just the thought of biting into a rubbery or grissley piece of meat makes me want to GAG!  Okay, so now that I've made you lose your appetite, here's some good news!  Several years ago when I was working as a corporate chef I made a meatball recipe to give the execs I worked for a bit of variety!  And this recipe has stuck with me ever since!!!  Perfectly seasoned and tender!  I LOVE these balls!!!;)  And believe me when I tell you, that says a lot!!!!  And they are so easy to make!


Thoroughly mix together using your hands:
3 lbs ground beef or sirloin, approx
1 cup Italian breadcrumbs
2 teaspoons Italian seasoning(I use Morton & Bassett, love the flavor and no MSG:)
2 teaspoons sea or kosher salt


Once the ingredients above are mixed well, roll into 1 1/2-2 inch in diameter balls.  Put in a frying pan over medium high heat to brown slightly and lock in juices!  Take a jar of your favorite spaghetti sauce and poor half of the jar into the bottom of your empty crock pot.  Then put your browned meatballs in the crock pot and cover with the other half of the sauce.  Cook on low for 4-5 hours!  It's all about the slow cooking with these little gems people!  Don't try to rush perfection!!!  Enjoy with your favorite pasta!!!  Make sure you have extra sauce on the side!  The recipe above makes roughly 35 meatballs, which serves about 7-8 hungry people!!!


Disclaimer:  Don't let the images fool you!  Obviously it was dinner time and a little too dark outside to take advantage of nice natural light!  Sorry about that!:/


images by Kara      

Friday, March 4, 2011

Play Nook


I was going to share with you my recipe for refried beans today, but then I got carried away with a little project and decided I'd share this with you instead. Come back next week for the beans cause they are DEEEEE-LISH!

For the better part of last night and today I've been working on our little play nook. Since we've lived in this house this little space has evolved quite a bit, but I think we've finally found the right fit. The first requirement for this space was to have a place for all our children's books (we've got tonz) and the second requirement was to have some storage for toys. We went to IKEA and got the Expedit bookcase in white, which you see everywhere, but there is a reason: it's clean, inexpensive, lends itself well to a variety of styles and is GREAT for storing things.
I totally stocked the bookcase to the gills. I was shocked at how much I was able to fit in it. Visually, I think the individual cubbies could stand to have some breathing room in and around them, but whatev's. I'm sure I'll be doing lots more tweaking a couple days from now after I've had time to live with it and really study it.
I color coded all the books and some of the toys. I did this solely for selfish reasons-- I'm sure this will put a pep in my step when I walk by.
A shot of the little table and chairs.

The large painting is a scene from the The Three Little Pigs and the other painting is of Humpty Dumpty swinging. The long wooden vessel with the metal handle has crayons, markers, and colored pencils in it (safely out of reach of little hands). The wooden counting scale is a toy from my childhood that I was fortunate enough to snag before it went to D.I. It's still in perfect condition and I love the primary colors.
This art easel sits on the wall opposite of the bookcase.

Thanks for obliging me and letting me give you the tour. If you have any questions, feel free to leave a comment. :)

I hope you all have a fabulous weekend and hopefully there will be signs of Spring in your neck of the woods. As always, thanks for being here and reading our little slice of the internet. Love you guys!

all images by Briana