Two sisters cooking and creating...and neglecting laundry. Welcome to our slice of the internet!
Showing posts with label Frozen dessert. Show all posts

Saturday, June 23, 2012

Addictive Ice Cream Cake

It's hot out. Let's make ice cream cake.....or ice cream pie! Call it what you want to. I call it ice cream cake because I make mine in a Springform-- you know, the pan you make cheesecake in? If you make it in a pie dish- it is customary that you call it ice cream pie, but SPOILER ALERT-- it tastes the same either way. And it is so darn delicious and addictive. You'll be wanting to make ice cream cake/pie til the cows come home. 
Though, I highly recommend you pull your springform that's collecting dust off the top shelf and make this delectable frozen dessert in it. Springform is lonely and needs some action. My springform hasn't gotten any since I made cheesecake two years ago around the holidays. Poor guy.
You can use any kind of ice cream you want to make this, but my fav combo is mint choco chip. I think vanilla topped with caramel sauce and some toasted nuts would be dang good too. Just make what pleases your taste buds. Here's the formula:
Made in a 9in Springform pan:
1.5 quart of good quality ice cream, in my case mint choco-chip
2 sleeves of oreos from a 15oz pack
5-6 tablespoons melted butter
3/4 cup (ish) hot fudge sauce

-In a food processor, process the oreos and melted butter together until combined and the oreos have a fine crumble. Pour the oreo crumble out into the springform and press it evenly and firmly to make the crust. Cover and freeze for a 1/2 hour- you can also leave it for longer if you need the time. 
-Pull ice cream out and let it sit for 10 minutes to soften. I like to use a large serving spoon to scoop the ice cream into the springfrom- you get nice long pieces of ice cream this way and it is easier to make it even and to spread. Fill springform with ice cream. Using back of serving spoon, spread ice cream around to even it out. 
-Top with hot, hot fudge. Cover and freeze for at least 45 minutes. Before cutting allow it to sit for 5-10 minutes, unfasten the springform and lift off. Use a sharp knife to cut into wedges. Enjoy!
See ya next week, guys! Thanks for stopping in!


images by Briana

Wednesday, May 30, 2012

Cousin Day + Hand Mixed Ice Cream

Lily invited her cousin Grace up for a cousin day today. So far they've had a picnic, gone swimming, taken a bath, had a snack, watched a movie and eaten ice cream! When I told Randy all that they had been doing, he said: "I want to be four again." Haha. Being a kid is pretty great. And being a kid at the beginning of summer? Well, that is just about the best thing in the whole wide world.
I mentioned in another post that I hand mixed some ice cream Cold Stone style for dessert one night. It's right smack dab between hard pack ice cream and a shake. It's totally yummy. I made raspberries 'n' cream for the girls. I scooped vanilla ice cream out onto my cutting board and placed a few fresh raspberries on top, then just scooped and smashed the ice cream until it was mixed. 
Cute cuzzies.
And for me, I mixed in some lemon cookies. It was pretty naughty. 
I'm looking forward to trying some more kinds of hand mixed ice creams this summer. Here are some topping ideas dancing around my brain:

marshmallow creme
 caramel sauce
roasted/salted nuts
shredded coconut
any fresh or frozen fruit
peanut butter
oreos- mint, golden and regular (no brainer)
candy bars
lemon and lime zest (WORD TO YOUR MOM!)
Cookies
And the list goes on...

Hope your Wednesday is going swell, dudes. Thanks for popping in!

images by Briana

Monday, March 12, 2012

Easy Oreo Ice Cream

Okay you guys, let me first say how excited I've been to share this recipe with you!!!  The original recipe is from Paula Deen, but I felt I needed to modify it because her recipe has raw eggs yolks in it.  No offense to the Queen of all things rich and indulgent but because I knew I'd be serving this ice cream to my 2 and 4 year old, I wanted those eggs yolks nice and cooked!  The results were sheer, unadulterated PERFECTION!  Smooth, creamy, sweet perfection!  It turned out so amazing in fact, that I've started experimenting with other flavors!  Reese's Peanut Butter Cup, Nutty Coconut and I'm going to do Mint Chocolate Chip next!  We love ice cream at our house and because this is just so easy to whip together, I've been inspired to make all of my ice cream from scratch!  This makes me feel great because we will now be avoiding all of the chemicals, additives and hormones in store bought ice cream!  I'm even going to head to expedx to see what I can find in way of cool ice cream containers!  Aaaand...NO ICE CREAM MACHINE REQUIRED!!!!  AMAZING!

Just 6 simple ingredients:
1 cup 2% or whole milk(I like Horizon organic)
3 large or extra large egg yolks
1 14 oz can sweetened condensed milk
2 cups heavy whipping cream
2 teaspoons pure vanilla extract
1 1/2 cups rough chopped Oreo cookies(Paul Newman's chocolate sandwich cookies would be awesome too:)

In a small sauce pan, over medium heat, bring the milk to a scald(not quite boiling).  While the milk is heating, in a medium bowl, whisk the 3 egg yolks and condensed milk together.  Once the milk is scalding, turn the heat off and pour it very slowly into the egg mixture, whisking constantly!  This process is tempering your egg yolks so they don't start to scramble;).  Once the hot milk and egg mixture have been combined thoroughly, pour it back into the saucepan and turn your heat to medium-low.  Whisking constantly and making sure you are keeping your whisk moving on the bottom of the pan so the mixture doesn't scramble.  Cook the mixture until it thickens a bit and can coat the back of a spoon.  Be patient, it may take about 7-10 minutes!  And don't worry if while your whisking, the mixture becomes foamy on top.  This is just fine!  Once thickened, pour the cooked custard(egg yolk/milk mixture) into a clean and dry container with a lid.  Cover it with the lid and put it in the fridge to cool for 1-2 hours.  Once the custard has cooled, whip your heavy cream to soft peaks.  Add the vanilla and continue to whip until stiff peaks form.  Pour your cooled custard into the whipped cream and mix thoroughly.  Mix in your rough chopped Oreos.  The mixture should be thick enough that the Oreo chunks stay suspended.  Now pour your "almost" finished ice cream into a freezer friendly container with a lid.  Cover and put in the freezer for 6 hours.  When you bring it out to serve, you will not believe how amazing it sets up and the creamy smooth consistency it will have!
Note:  Be sure to place plastic wrap on top of ice cream once it has frozen and then put the lid back on.  This will help to keep it fresher longer and help to avoid ice crystals.


The smiles alone, make this ice cream worth the wait!:)  And I promise you, it really is soooo simple!  And if you are at all worried about your custard mixture having a few little "scrambles" in it, before you add it to the whipped cream, just pour it into a strainer over the top of the whipped cream and that will catch anything unwanted.;)  Be sure to check back because I'll be sharing more flavors in the coming weeks!
Questions???  Let's chat in the comments!


Original recipe from Paula Deen, modified recipe from Kara, images by Kara


Sunday, January 1, 2012

A Few Things I'm Loving Right Now!

Happy New Year's everyone!  2012 has a nice ring to it!  Hopefully it's your best year yet!  Here are a few things I can't get enough of at the moment!
1.  The Riesenthel Carrybag XS


I've been using these beauties in my office/craftroom to store anything that needs, well, storing!  I also keep the polka dot version for car storage!  You can find them here along with several other cute bags and totes!


2.  Dreyers Slow Churned Vanilla + Trader Joes Candy Cane Joe Joe's


So, ala Cold Stone Creamery, I scoop out the ice cream onto my {clean} countertop.  Then I crush and mix in a few Candy Cane Joe-Joe's!  Creamy, peppermint perfection!!!!!


3.  Knitted ballet slippers
Our Mom called on my good friend Heather from Handmadebeanies.com to make each of us girls a pair of these adorable knitted slippers for Christmas!  They are toasty warm and I love how they look!  Amazing work Heather!   


images by Kara 

Friday, July 22, 2011

Chocolate Dipped Frozen Bananas


Hi, guys! I'm so glad it's the weekend. It's hot out and we've been enjoying lots of frozen treats lately. Here are some throw-back frozen bananas I made this morning that were inspired by some I saw over at the blog- the little red house. We'll surely be enjoying these this afternoon. You should make these this weekend! Have a good one, dudes! Happy Pioneer Day to all us Utahans!
Slice some bananas in half and stick popsicle sticks or candy sticks up through the cut side. Place in freezer at least an hour.
Melt a bag of semi-sweet chocolate chips and a teaspoon of oil. Dip frozen bananas in the melted chocolate then roll the dipped banana in toppings of your choice: rainbow sprinkles (for the kiddies), chopped nuts, crushed candy bars, coconut, marshmallows (per my daughters request), etc.
Place dipped and rolled bananas on parchment lined cookie sheet. Cover lightly with plastic wrap and freeze for at least an hour or two before serving. Enjoy!

images by Briana

Monday, August 23, 2010

Fro-Yo!


Heard of Fro-Yo? Heehee, I kid.

This recipe exceeded my expectations on all levels (I did a little dance around my kitchen after I tried a bite). Tart and tangy and oh so creamy and smooth. Make some if you haven't already. I followed the original recipe fairly close, but opted to add a little less sugar and a little less vanilla.

Recipe:

3 cups greek yogurt
1 teaspoon vanilla (I added a 1/2 teaspoon)
3/4 cup sugar (I added a little less then 2/3 cup, you can always taste and add more if you like)

Mix the ingredients all together in a bowl. Cover and refrigerate for 1 hour. Pour into an ice cream maker and follow manufacturers instructions for freezing. Mine was done freezing and churning in a half hour. Serve immediately. You can top it with any variety of fresh fruits. When I made this on Saturday we sprinkled shaved coconut over the top and it was heavenly.

Design Mom blogged about this recipe here.

Image by Briana

Tuesday, August 3, 2010

Refreshing Mid-Summer Slush


I had this slush a couple weeks ago at a baby shower. It was so wonderfully delish and refreshing that I had about 5 servings and couldn't shut-up about how good it was the whole evening. By nights end, I had to have the recipe and lucky for me, the wonderful woman who made it brought copies (she must get asked for the recipe a lot)! I made the slush a few days later for a family bbq and it was smiles all around.

Recipe:

4 cups white sugar
4 cups boiling water
4 cups pineapple juice
2 1/2 cups orange juice
5 cups mashed bananas
12 pack of Sprite or 7-Up

Dissolve 4 cups white sugar into 4 cups boiling water in a large pot. Turn heat off and add 4 cups pineapple juice and 2 1/2 cups orange juice (I use the Simply brand). Add 5 cups mashed banana (It takes about 10-11 bananas to make 5 cups of mashed bananas). Stir the bananas around until evenly distributed. Pour into two 9x13 metal pans, dividing the mixture evenly. Cover with plastic wrap and then tin foil over the plastic wrap. Freeze for at least 4 hours or you could freeze anywhere up to a week (I just pulled some from the freezer that had been in there for well over a week and it looked and tasted just as good as the day I made it).

When ready to serve, take the pan (or both) out of freezer and let it sit for about 20-30 minutes on your counter top (the time could be less depending on the temp. of the room). Break up slush with a fork and then scoop 3 heaping tablespoons (or more) of slush into a cup. Pour chilled sprite or 7-up over the slush. Serve with a spoon.

Image by Briana
Hand model is my mom. GO MOM!

Tuesday, July 13, 2010

Pudding Pops

I’m so excited that the weekend is here and even more excited that we get to celebrate Independence Day! The fourth of July is one of my very favorite holidays. I love all the excitement in the air. After I get this recipe posted we are running out to the store to buy fireworks and then heading down to a family party. I hope you all have some excellent plans in the works as well. Thanks so much for all your sweet comments and emails— they mean so much to Kara and I. This’ll be my last post until next week. Until then, pals. :)

Whatever happened to JELL-O pudding pops? I loved those things….especially the chocolate-vanilla swirl. For this recipe I used chocolate and vanilla instant pudding, but you could use any flavors you prefer. I think banana would be fantastic.

Recipe:

1 small box chocolate fudge instant pudding mix

1 small box vanilla instant pudding mix

2 cups cold whole milk

2 cups cold half & half

12 3 oz paper or plastic cups

12 wooden popsicle sticks

For these pops I used 3 oz. cups as my molds. You can find them in the paper products aisle. Before you make your puddings. Take a cupcake pan and place 12, 3 oz. cups in each of the cupcake molds. Set aside. In a medium bowl pour in 1 cup whole milk, 1 cup half&half, and vanilla instant pudding. With a hand mixer blend on high for a minute or two. Set aside. In another medium bowl mix the remaining cup of whole milk and cup of half&half, and the chocolate pudding. Blend on high for a minute. Now you are ready to pour the puddings into the 3 oz. cups. Try and work quickly or the pudding will set up and make it harder to pour. I like to alternate pouring between the chocolate and the vanilla to create a swirl affect. Also, dipping and gently stirring a butter knife after pouring will help create a better swirl affect. Make sure not to over-fill. The pudding will expand as it freezes. When you are done pouring in puddings, position a popsicle stick in the center. Try and avoid pushing it all the way to the bottom. Gently try your best to cover and wrap the cupcake tin with plastic-wrap. Allow to freeze for at least 4 hours. When frozen solid and ready to serve, simply cut the cup away from the pudding pop and serve.

Recipe by Bri

Strawberry Mango-Lime Popsicles

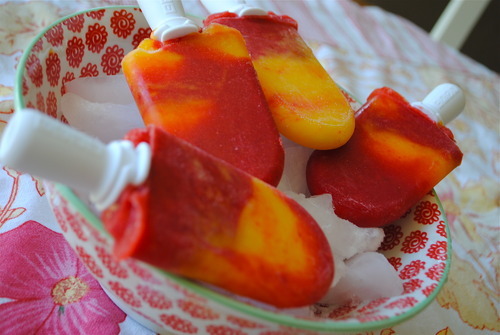
Popsicles are the quintessential summer treat. Don’t they remind you of your childhood? I can recall many a fourth of July spent slurping on a popsicle. With the fourth nearly upon us, I thought this would be a fun throw-back if you will. You can be as creative as you want when you make these, or you can be a purist and pour juice right into your popsicle molds of choice (think: grape juice). I like both ways, but for today I wanted to make an icey treat that would boast some flavors reminiscent of summer: strawberries, mangos, and lime. Ooooooohweee! I had a lot of fun making these and I think you will too.

Side note: I used agave nectar in this recipe. This is a great sweetener to have in your pantry (you can find it in the natural food section of your grocery store). It also has a lower glycemic index.

Recipe:

1 lb fresh strawberries, rinsed, stems removed and cut into small chunks.

2 mangos, rinsed

1 cup water

Juice of 3 limes

3/4 cup light agave nectar

In a blender pour in water and half of your strawberries. Pulse until it resembles a smooth mixture and no strawberry chunks are visible. Pour in remaining half of strawberries and 1/2 cup of agave nectar into blender. Pulse until you reach desired consistency. I prefer a smooth texture to a chunky texture with my popsicles, so I blended it until the strawberry chunks were very fine, almost completely blended. Taste the puree here and add more nectar if you prefer. Remember: When things are frozen the sweetening and flavor is somewhat decreased, so you want your strawberry puree to be fairly sweet. Next, pour strawberry puree into a medium bowl. Cover and place in fridge to chill. Rinse out blender pitcher and place it back on motor.

Now you need to remove the flesh from the mango. Mangos have a long, flat pit in the middle. What you want to do is slide your knife down the length of the mango, removing the flesh in long strokes trying to avoid the tough pit (you will know when you’ve bumped into it). Don’t worry about the skins, you’ll discard them in a minute. When you’ve finished removing all the flesh as best as you can, take a spoon and scoop the flesh out of the skin. I like to do this over the pitcher, so I can plop the scooped mango right in. When finished, pour in lime juice and remaining 1/4 cup of agave nectar into pitcher. Blend until smooth. You could opt to chill the mango-lime mixture right now for 20 min. to give you a head start in the freezing process like the strawberry puree, but I opted not to. You are now ready to pour purees into desired molds.

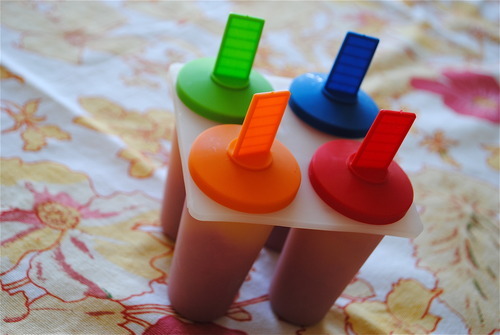
I did this two different ways: I used conventional molds and a quick pop maker.

For conventional molds: Pour purees into molds, alternating between the strawberry and mango-lime. Make sure you pour the purees just shy of the top (the puree will expand as it freezes). I highly recommend freezing them for at least 4-6 hours or overnight. If you are having a hard time removing popsicles from molds, run some luke warm water over the mold portion and it will slide right out. Also, if the molds you’re using require you to provide your own sticks, allow the puree to set up and freeze in the molds for 30 minutes then position sticks.

Most of us don’t have a quick pop maker lying around. Heck, I don’t even have one lying around. I just happen to have a wonderful mom, who is the queen of all things innovative in the kitchen, who graciously let me borrow hers. Now, I don’t want to step on conventional popsicle molds toes, but with this quick pop maker I was able to make 12, frozen solid popsicles in 40 minutes flat (it takes 7-9 minutes to freeze each set of popsicles solid). Yowza. It was such a slick set-up. If it was in the budg’, I’d definitely be snagging one. I love products that actually “do” what they say they’re going to do. I followed the exact same process that I list for pouring the puree into conventional molds, it just takes a fraction of the time to freeze the pops solid.

Recipe will easily make 12-15 popsicles depending on the sizes of your molds.

Recipe by Bri