Two sisters cooking and creating...and neglecting laundry. Welcome to our slice of the internet!
Showing posts with label side dish. Show all posts

Wednesday, May 16, 2012

Best Baked Potatoes

I've liked baked potatoes my whole life. I like them loaded up or paired down with just a pat of buttah. They're a versatile little side. These'll also pair perfectly with all the proteins coming off your grill in the coming months! This way of baking potatoes will produce a crispy skin and a fluffy inside. They're so dang good. Here is what you need:
-Russet potatoes *you can technically bake any potato you want, but russets are a starchy potato that will give you the fluffy texture. Also, buy Russets with an even brown tone without any greenish cast.
-olive oil
-kosher salt or sea salt

1. Adjust oven rack to the middle position. Position another oven rack in the next position beneath the middle rack. Place a cookie sheet on this rack. Preheat oven to 350 degrees.

2. Rinse and thoroughly scrub each potato under cold running water. Place potatoes on a dry towel and pat dry.

3. Look the cleaned and dry potatoes over and remove any dark spots or bruises.

4. Pierce each potato deeply with a fork or a knife, 4-6 times. This is a very important step. The piercings allow steam to escape- if you don't the potatoes could explode causing a fourletterwordmess in your oven. 

5. Rub the outside of the potatoes with olive oil. Sprinkle each potato with a generous sprinkling of salt and rub it around the entire potato.

6. Using tongs, place potatoes directly on the middle oven rack (don't be tempted to wrap the potatoes in foil). Make sure your cookie sheet is directly on the rack underneath to catch any drippings.

7. Bake potatoes until tender, about an hour at 350 degrees. You can also do 400 degrees for 45 minutes.

8. Remove potatoes from oven using tongs. Slit the top, pinch ends and squeeze together to pop open. Top with your favorite toppings. 
And please, pretty please enjoy those crispy skins along with that fluffy white goodness! It's only proper.

images by Briana

Friday, April 27, 2012

Winner of Bracelet + Cauliflower and Ham Gratin

Thanks to all who entered the bracelet giveaway! Giveaways are fun but, man, do I wish with all sincerity that you could all win. The winner chosen via random.org is AMANDA. Congrats, girl!
Email me at sisandpiglet@gmail with your address so I can get this bracelet in the mail for ya asap.
- - - - - - - - - - - - - - - - - - - - - - - - - - - - - - - - - - - - - - - - - - - - - - - - - 
My dinners haven't been all that good lately. Super blah. We all sorta pick at our food and the girls never really get full. Like clockwork, they're asking for cereal an hour after dinner is cleaned up. I'm over it and I'm trying to inject some life back into our dinners! No more staring blankly into the fridge at 5:00 wondering what to feed my family that night! 
I've been doing some meal planning and been focused and all business at the grocery store. It's going so well! Having a plan has been so liberating and it's cut out the stress. My goal with meal planning isn't to make fancy or complicated meals- just food that tastes good and is healthy.
I'm exploring the idea of doing a little meal planning series here on the blog. Is that something that would interest you guys? Let me know in the comments. It could be fun, I think. I'd also love to hear some of your weeknight meal ideas! 
Okay, let's talk about this Cauliflower and Ham gratin, finally!
 It's a delicious comfort dish and Randy and Lily asked for me to make it again sometime soon. Glory be! Lily kept saying between bites: "Mmmmm, mom, this is good...like, really good". The original recipe comes from Real Simple. It called for goat cheese, bread crumbs and thyme, which all sounded delicious to me, but I changed things up to cater to the kids and husband. Enjoy!

Recipe (9 in square pan):
2 tablespoons butter
1 medium sized yellow onion, diced
1 8oz package Hormel Natural Choice sliced Honey Ham, cut into 1/2 in pieces
1 1/2 cups heavy cream
1/2 cup milk
1 heaping cup grated cheddar cheese (I prefer to grate the cheese myself)
kosher salt and pepper
1 head cauliflower, washed and cut into florets (try and keep the florets small if feeding to kids)

Heat oven to 375 degrees. Melt the butter in a large sauce pot over medium-high heat. Add the onion and cook until softened and golden brown, about 6 minutes. Add ham and cook for a couple more minutes. Add the cream, milk, cheese, 1/4 teaspoon salt and 1/4 teaspoon pepper. Bring to a boil. Reduce heat to medium-low. Simmer until thickened, about 4 minutes. Add cauliflower florets and stir to combine and coat.
Transfer to 9 in square baking dish. Sprinkle with more shredded cheddar cheese. Cover with aluminum foil. Bake for twenty minutes. Uncover and continue baking until the cauliflower is tender, 20 minutes. Remove from oven and let rest for at least 5 minutes before serving. 
images by Briana


Thanks for stopping in today! Hope you find sometime to kick back and relax this weekend! See you next week.

Wednesday, February 29, 2012

Broccoli and Gruyere Gratin

This is officially my new favorite side dish. Guys, it so good! Even Randy, who isn't a broccoli fan, thinks it's delicious. My four year old and 23 month old even like it. I've made it to go with roast chicken and I've even had it be the main dish and served a salad on the side. I think you could serve it with pretty much anything you wanted. Thanks to Real Simple for the recipe! Enjoy!

Recipe (*9 in square baking dish):

2 large bunches broccoli, chopped into florets
1/2 stick butter (4 tablespoons)
1/4 cup all-purpose flour
2 cups whole milk
2 1/2 cups grated Gruyere cheese
1/2 teaspoon salt
1/4 teaspoon fresh ground black pepper

1. Preheat oven to 375 degrees. In a large pot, fill with a 1/2 inch of water. Bring to a simmer and add broccoli florets. Cover and steam for 3 minutes. Remove from heat and gently pour florets and water into a colander to drain.
2. Melt butter in a small sauce pan. Whisk in flour and cook for two minutes while whisking. Don't let the mixture darken. Whisk in milk and simmer until thickened. Remove from heat and add 1 cup Gruyere cheese (I do a heaping cup), salt and pepper. 
3. Shake colander to let excess water escape. Transfer florets to your baking dish. Pour Gruyere sauce over the top. Using a spoon scoop the florets around to coat.
4. Top with remaining Gruyere cheese. Bake for 35-40 minutes, or until bubbly and golden. Let sit for 10 minutes before serving.

*The Real Simple recipe calls for baking in a 9x13 pan, but I found the 9x13 pan to be a little too big for this recipe so I opt to bake mine in a 9 in square pan. For a 9x13 pan, I would double the sauce recipe, increase the amount of Gruyere you sprinkle on top, and increase the broccoli to three large bunches instead of two. 
Thanks for stopping in today! 

all images by Briana

Pin It

Wednesday, July 13, 2011

Fresh Cut Oven Fries


Fries should be fried, I'm just going to come right out and say it.

BUT.

Sometimes we don't want to fuss with an intimidating pot of oil and a thermometer. And the thick smell of oil that hangs in the air after frying.

In most cases, it seems as though fries cooked in the oven end up soggy. This method of preparing fries delivers a crispy fry on the outside with a steamy mashed-potato like center. Mmmmmmmm, goooood. You can throw these together with ease and all the ingredients are things that you most likely have in your pantry, at the ready. Enjoy!

Recipe:

2 1/2 pounds baking potatoes
1 1/2 teaspoons vegetable oil
1 1/2 teaspoons white sugar (trust, you won't know it's there and it'll help crisp the fries up)
1 teaspoon salt
1/4 teaspoon ground cayenne pepper

Preheat oven to 425 degrees. Coat a baking sheet (don't use foil, it'll be a hassle when you are trying to flip the fries) THOROUGHLY with cooking spray or you can use your hands to rub vegetable oil over its surface.

Scrub potatoes well and cut into 1/4-1/2 inch thick fries. Here's how:
Using a sharp knife, cut a thin amount of potato off on all four sides, so it resembles a brick...
with rounded ends. :)
Slice 1/4-1/2 inch slices down the length of your potato brick.
Now slice each flat piece into 1/4-1/2 in strips (feel free to clip off any undesirable black spots as well). Voila, uncooked fries!

In a large mixing bowl, thoroughly toss uncooked fries, vegetable oil, white sugar, salt, and cayenne pepper.
Spread on baking sheet (see the tinfoil? brain fart. don't be like me) in a single layer. Try your best not to have the fries piled on top of each other. This will result in soggy fries.
Bake for 30-35 minutes in 425 degree oven. Halfway through baking take a spatula and flip fries over to brown and crisp up evenly.
Remove from oven and allow to cool for a few minutes before serving.

I found that the fries were perfectly seasoned, but feel free to season with more salt if you prefer. Be careful though, you'll most likely be dipping them in sauces that will add salt and flavor.

Kara and I always make barbecue fry sauce when my dad makes his special fries (that are actually fried). It's taken us hours to perfect this sauce....and I will be as bold to say that we invented it. Drumroll---------------------->
Barbecue Fry Sauce:

1/2 cup (give or take) Mayo, heaping (Best Foods or Hellmanns)
1/4 cup (give or take) barbecue sauce

In a small bowl, mix mayo and barbecue sauce vigorously until combined and smooth. Taste and adjust. Adding more barbecue sauce or Mayo depending on your taste. Serve immediately or cover and refrigerate.

P.S. Wanna know what else I like to dip fries in? Shakes. You too?

images by Briana....and one by Randy. :)

Friday, July 8, 2011

Zesty Corn Salsa


This salsa very well could already be in your recipe book, but I thought I'd bring it up today and remind us all of its zesty deliciousness. Bring this salsa with a bag of your favorite corn chips to your next barbecue and people will be wanting to hoist you on their shoulders and chant your name because they have something to snack on and tide their ravenous hunger over while the meat grills. Enjoy!

2 15 oz cans Shoepeg corn
1 15 oz can black beans, drained and rinsed
1 bunch cilantro, finely minced
1 medium red onion, finely diced
3 roma tomatoes, diced
1 8oz bottle Kraft Zesty Italian Dressing

Combine all ingredients in a medium bowl. Cover and refrigerate before serving. Salsa will keep covered and refrigerated up to 4 days.

Thanks for stopping by! Hope you've got some fun weekend plans in the works!

image by Briana

Friday, June 10, 2011

Lime Curd + Mascarpone Cream Fruit Dip

I'm a huge fan of anything with lime in it!  When I was in culinary school I was given a recipe for lime curd that can't possibly be any better!!!!  Some lemon and lime curd recipes have a tendency to taste "eggy" and I'm not a fan of that!  This recipe is fresh, tart, sweet and buttery!!!!  It was my brother's birthday on Sunday and the menu was fish and pork tacos.  So I decided to make a side dish/dessert that would be a lovely compliment to the meal!  I made the lime curd and added some sweetened mascarpone cream cheese to it!  The combination was absolute perfection!  Creamy, silky, sweet & slightly tart PERFECTION!!!!  It was so good I'm already planning on using this combo in other recipes!!!!  Look for them soon!

Ingredients:
Beat together:
2 eight oz containers mascarpone cream cheese
2 tablespoons granulated sugar
Add and mix thoroughly:
1 cup lime curd (recipe here)
Store in a clean container in the fridge until ready to use!


images by Kara  

Thursday, March 10, 2011

Homemade Frijoles Refritos


After making and these refried beans, I am going to try my hardest to never eat pasty refried beans from a can again. That sounds dramatic, but I'm serious. They were so delicious and made me realize just how bad I've been missing out. You do have to put a little effort into making these: you've got to soak the dried beans, then cook them, and then cook them again (according to the package instructions). But it's definitely worth the extra effort. There isn't any lard in them either, which is a huge plus. Enjoy!

Recipe (10-12 servings):

1 lb bag dry pinto beans, prepped, presoaked and cooked (according to package instructions)
1 white onion, diced and sauteed till soft
1/2 cup - 1 cup water, divided
1-1/2 tablespoons olive oil
1-1 1/2 teaspoons salt
1/4 teaspoon black pepper
1/4-1/8 teaspoon cumin

In a large skillet, combine beans, 1/2 cup of your water and sauteed onion. Turn heat to medium. Using a potato masher, mash beans into a rough puree as everything heats. As the bean mixture cooks a lot of the moisture will cook off, so don't be afraid to add a little more water if you feel like the mixture is getting to pasty and dry (you can make them as thin or thick as you want). Before serving, stir in salt, pepper and cumin.

Few things can satisfy like a good ol' bean and cheese burrito can. Let me show you how I make mine:
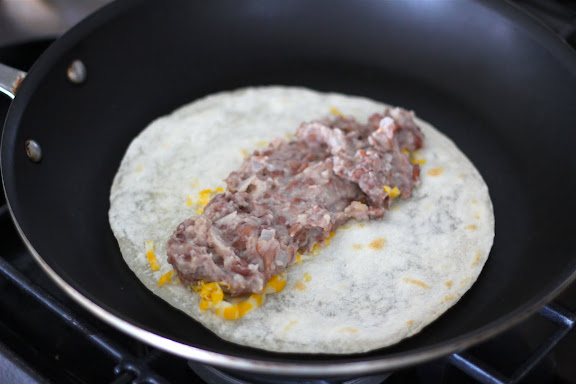
I start with uncooked tortillas. You can find them at your grocery store (try to buy ones that are made with canola oil vs. lard....seems like the lesser of the two evils). After you've cooked one side, flip it over and sprinkle a line of shredded cheese down the middle. As the other side of the tortilla cooks, the cheese will begin to melt.
Spoon refried beans (I have them getting hot in a separate skillet) over the melting shredded cheese.
On top of the beans drizzle some red or green sauce. The sauce pictured is Taco Bell Mild sauce in the bottle. I know, it's nothing gourmet; but I happen to dig the flavor and it's quick and easily accessible. I also love La Victoria green sauce on bean and cheese burritos as well.
Slide the tortilla onto a plate.
Wrap it up....
and wolf it down. The cheese will be melted and gooey and the beans and sauce will be hot, just as it all should be.

images by Briana

Wednesday, January 5, 2011

Chile Relleno Casserole

While I get the rest of my Christmas decorations down, take a look see at this recipe! My good friend Kelli made this for a party recently and I had thirds. And then I reheated some more the next day for lunch. It's so good. I think it would be fun to add to a brunch menu. Enjoy!

1 27 oz can whole chiles + 1 small can (If you can't find the 27 oz cans of whole chiles just buy 8 small ones)
1 lb monterey jack cheese, grated
1 lb cheddar cheese, grated
6 eggs
4 cups milk
1 cup flour
2 teaspoons salt

Preheat oven to 350 degrees. Butter or spray with cooking spray a 9x13 pan. Set aside. Open cans of chiles and drain juices out. Take each chile and rinse under water to get rid of seeds. Using your hands split each chile open, so it is completely flat. Lay a layer of chiles in the bottom of greased 9x13 pan. Over the top of the chiles generously sprinkle a combination of cheddar and jack cheese. Repeat this process two more times. Set aside. In a small bowl, whisk eggs, milk and salt until combined. Whisk in flour. Pour this mixture slowly over the layers of chile and cheese, making sure it gets in all corners. Sprinkle more cheese over the top if you have some left over. Bake uncovered for 1 hour at 350 degrees. Remove from oven and let sit for a few minutes before slicing into squares and serving. Refrigerate any left overs.
image by Briana

Tuesday, November 23, 2010

Thanksgiving Recipes: Gravy

Let's make gravy!
Recipe (yield 8-10 servings):

Reserved drippings from roasted turkey
1 32oz carton Kitchen Basics Turkey Stock
4-5 tablespoons cornstarch
salt and pepper to taste

In a medium pot, bring drippings (if you have refrigerated the drippings they will be congealed, but heat will liquify them) and 1/2 of your carton of turkey stock to a rapid boil. Place the 1/2 empty carton of turkey stock in the fridge. Allow drippings and stock to boil rapidly for a few minutes. P.S. This picture is not depicting a rapid boil. :)
Pull the carton of turkey stock from the fridge and pour it all in a small bowl. Add 4 heaping tablespoons of cornstarch and whisk rapidly and thoroughly to combine- the mixture will look creamy.
Slowly add cornstarch mixture to boiling drippings while whisking. Allow gravy to come back to a rapid boil. The mixture will immediately begin to thicken. Allow to boil for a few minutes.

Check and see if the gravy is thick enough to your liking, if not, you can make more thickening by whisking another tablespoon or two of cornstarch into a 1/2 cup of cool water and slowly whisk this into the gravy. Allow to boil to thicken further. Salt and pepper to taste.
Enjoy!

images by Briana
Tuesday, November 16, 2010

Thanksgiving Recipes: Christmas Ribbon Jell-O


This ribbon jell-o is a long standing Thanksgiving tradition at our house and I LOVE it. It's delicious, festive, and I haven't met a person who doesn't like it.....even people (like me) who get weirded out by Jell-O side dishes love it. I'm sure some of my sibs, cousins (Katie!), aunts, uncles and friends who are reading this can attest to how amazing it is. Please leave a comment and tell everyone how good it is! I wish I could send you all a slice right now. Enjoy!

1st layer:

1 6oz lime jell-o
3 cups boiling water

Dissolve lime jell-o into the boiling water. Pour into a 9x13 pyrex pan. Allow to set up in the refrigerator for the time it takes to make your second layer.

2nd layer:

1 cup pineapple juice
4 cups mini marshmallows
1- 6oz lemon jell-o
3 cups boiling water
2- 8oz cream cheese, softened and cut into pieces

In a large pot, pour in pineapple juice and mini marshmallows. Heat over medium-high heat, stirring often until marshmallows have melted and the mixture is smooth. Set aside. Boil 3 cups water in a small pot. Dissolve lemon jell-o into boiling hot water. Stir hot lemon jell-o and cream cheese pieces into marshmallow mixture. Use a wire whisk to combine the mixture. Whisk until cream cheese is fully combined and melted. Allow mixture to cool on your counter top for a 1/2 hour. When cooled, ladle all of it over the 1st layer of lime jell-o. Make sure you ladle it gently, so you don't dent or damage the lime jell-o layer. Place back in refrigerator to set up. Give it at least a 1/2 hour. Test it gently with your finger and if it springs back, it's ready for the third layer.

3rd layer:

1 6oz cherry jell-o
3 cups boiling water

Dissolve cherry jell-o into boiling hot water. Allow to cool on your counter top. When cooled, ladle over second layer. Refrigerate for at least one more hour before serving.

Christmas Ribbon Jell-O will last 8-10 days in your fridge. You can cover it, but keep in mind that plastic wrap and press n seal have a strong tendency to suction into the Jell-O, so when you remove the wrap it ends up peeling some of the Jell-O off with it.

image by Briana

Wednesday, November 10, 2010

Thanksgiving Recipes: Zucchini Stuffing Casserole


Sorry for the poor picture. The sun had set and I was starving and didn't take the time to style a craveable picture. But now I really wish I would have because I'm afraid you won't try it now.....annnnd you need to. It's one of those recipes I couldn't shut up about. My sis-in-laws aunt is the creator of it. We had it this past Sunday as a side dish and it was delicious and there wasn't a speck left at the end of the night. This is another great side dish option for your upcoming Thanksgiving feast. Enjoy!

Recipe:

3-4 medium zucchini, diced into 1/4 inch pieces
5 carrots, diced into 1/4 inch pieces
5 celery stalks, diced into 1/4 inch pieces
1/2 cup lite sour cream (I like Daisy brand)
1 lg. yellow onion, diced finely
1 small box Stove Top (chicken flavor)
1 can cream of celery soup
3/4 cube butter
1 tsp. pepper

Preheat oven to 350 degrees. Fill a large pot with water, half full. Bring to a boil. Add carrots and celery. Boil for ten minutes then add diced zucchini. Boil for another few minutes. Turn heat off and drain water from the pot. Set aside. In a large skillet, melt 3/4 stick butter. Add onions and saute until tender. Add Stove Top, sour cream, and cream of celery soup. Mix until combined. Add carrots, celery and zuchini and fold mixture until combined. Lightly butter a casserole dish or other baking dish you prefer. Pour stuffing mixture in dish. Cover and bake for 30-40 minutes. Serve immediately. Refrigerate left-overs.

Lame image by Briana

Monday, November 8, 2010

Thanksgiving Recipes: Candied Yam Casserole


I can't believe it's November already. Time for Thanksgiving recipes! Let's start with Candied Yams. Candied Yams are a must to make your Thanksgiving feast complete. This is my moms recipe and it is goooo-ooood. Enjoy!

Recipe for yams:
4-5 yams (you could sub in sweet potatoes if you prefer but the yams are more vibrant)
1/4-1/3 cup heavy whipping cream (not whipped)
1/3 cup brown sugar
3/4 stick butter
1 teaspoon salt

Fill a large pot half full with water. Bring to a boil over high heat. Scrub yams clean and quarter them into equal size pieces. Carefully place yams in boiling water. Allow to cook for 20 minutes or until fork tender. Drain water from pot. While leaving the yams in the pot, carefully peel the skins from the yams and discard. The yams will be very hot but using a fork or spoon will help-- the skins will slide right off with little effort. Add 3/4 stick butter to the yams and place lid on pot allowing butter to melt. After a few minutes, take a masher and mash yams and butter roughly. Add brown sugar and salt. Using a hand mixer, mix in the sugar and salt at medium speed. Slowly add in cream while mixing at medium speed until smooth. Taste and add more salt or brown sugar if you prefer. Smooth the whipped yam mixture evenly into a lightly buttered baking dish (this recipe will fit a 9x13 pyrex or a comparable baking dish), set aside.

Recipe for topping:
Scant 2 cups finely chopped pecans
1 1/4 cup brown sugar
3/4 stick butter, room temp (you don't want it too soft)
2 1/2 tablespoons flour

In a small bowl, using a hand mixer, mix the butter, brown sugar and flour together until combined yet crumbly. Add pecans and stir until thoroughly coated and combined. Take this topping and spoon it evenly over the whipped yams. Cover and bake at 350 degrees for 20 minutes. Allow to cool for 5 minutes before serving.
before
after

Images by Briana

Tuesday, September 28, 2010

Smashed Potatoes Smothered in Pea Gravy


First off, forgive me for the lighting situation going on on this picture. The sun had already set when I made this, so I had to settle for the light from our dining fixture. This may be the case with a lot of pictures now since the days are getting shorter. :(

Secondly, I'm a little sheepish about sharing this recipe, but before you make your mind up about it just yet, read on. My Mom made this when we were growing up and now I make it for my family. My siblings and I would ALWAYS go for seconds. It is comforting, warm, and feels good in the belly. My mom called it pea gravy, but really all it is, is a white sauce with frozen peas added to it. No pureeing or smashing nonsense.

Lastly, you can serve this over a baked potato instead of the smashed potatoes. I was short on time so I opted to boil the potatoes and smash them. Both ways are good! To make it a meal, be sure and serve a green salad on the side. You could also serve some toasted bread on the side as well. This meal may not be fancy, but it's DELICIOUS...and that's all we really want after a busy day, right?

*Begin by prepping the potatoes (scroll down) first and while they are boiling make the pea gravy. This way, everything will come together close to the same time and still be hot*

Recipe for the Pea Gravy (yield: 4-6):

1 cup frozen petite peas (1/2 of 16 oz bag)
2 generous Tbs butter
2 Tbs flour
2 cups milk (I recommend whole or 2%)
Salt and Pepper to taste

In a medium sauce pan over medium-low heat melt 2 Tbs butter. Add 2 Tbs flour to melted butter and whisk vigorously. This mixture will be paste like. Continue to whisk vigorously while slowly pouring in your 2 cups milk. Turn heat up to medium. Whisking often, allow to cook until mixture begins to thicken and slightly bubble. This should take a few minutes. Add frozen peas. Allow the peas to heat all the way through, making sure you are still stirring often. This will take about 5 minutes. When the peas have heated through you may need to add a splash or two of milk if the mixture seems to thick. Now you need to season the pea gravy. Start by adding a couple teaspoons each of salt and pepper. Taste and increase seasonings to your liking. Serve pea gravy immediately over smashed or baked potatoes.

Recipe for Smashed Potatoes (yield 4-6):

4 mediumish russet potatoes
1 stick of butter, room temp.
1/4 cup milk
Salt and Pepper to taste

Wash and peel potatoes. Don't be too concerned about peeling them perfectly. Cut them into 1-2 inch size pieces. Take a large pot and fill it 1/2 full of water. Place pot on stove and turn heat to high. Gently pour all potato pieces in water. Don't wait for the water to come to a boil before you add your potatoes, this will result in the outside of the potatoes cooking and the inside not. Cover and cook potatoes on rapid boil for 15 minutes, check to see if fork tender. If not, cook for another couple minutes and then check again. When potatoes are fork tender remove pot from heat using oven mits. Crack the lid slightly to the side and drain all the water from the potatoes. Immediately unwrap your stick of butter and drop it in the pot with the potatoes. Cover and let sit for a few minutes, allowing the butter to melt. When butter has melted, pour in milk. Using a masher, smash potatoes roughly. You aren't trying to make them smooth. Salt and Pepper to taste. Serve immediately smothered in Pea Gravy.

I hope you enjoy this humble little meal as much as I do!

image by Briana

Friday, September 17, 2010

Game Day Cheese Dip

So, while my Sis has been diligently posting healthful recipes, I decided it was time for an "artery clogger." Just kidding. But we have to get a little crazy sometimes, right? Last Saturday we had a football game get together at our house and I found a recipe on chow hound I just had to try! It's super easy and I modified it only slightly to fit our tastes and needs. You cook it in a crock pot and my only suggestion would be to serve it from the crock pot as well, in order to keep the dip warm and gooey!

In a saute pan over medium high heat cook for about 3 minutes:
1 cup non-alchoholic beer(I used O'douls, the chowhound recipe calls for real beer:)
1/2 cup chopped green onions

In a large bowl mix together:
3 cups freshly grated monterey jack cheese
3 cups freshly grated medium cheddar cheese
1 tablespoon taco seasoning
2 tablespoons flour

Put cooked beer and green onion mixture into the crock pot set to low heat. Followed by the cheese mixture.
Add:
1 15 oz can original Nalley Chili
1 tablespoon chipotle paste
With a large spoon mix all of the contents in the crock pot together. It will take anywhere from 20-30 minutes for the cheese to melt completely and become irresistibly gooey!

hand model is my wonderful friend Breanna
image by Kar


Friday, September 10, 2010

Balsamic Roasted Sweet Potatoes + A Chopped Salad w/ Roasted Beets


Randy has been working late a lot, so dinner around here has been a major afterthought. Think: cold cereal, Taco Time drive-thru, yogurts, and pb&j.....I should still be making good meals for the girls (well, one is nursing, but....well, you get the idea) and I, but I haven't. Tonight, Randy, had to pull another late one so I decided that I would make a real dinner (finally) and we would pack it up, take it to his work and eat it all together! When I told Randy that we were going to come up and bring dinner he got so excited....made me wish I would have done this sooner, like four days ago sooner....I'm a slow learner...

It turned out to be a lovely little meal. I came up with the Balsamic Roasted Sweet Potatoes after seeing a lot of fun recipes floating around the web using a variety of vegetables, glazing them with balsamic and oil and then roasting them. I can't wait to try other vegetable varieties in the future!

Here is the breakdown:

Side note: Roast the sweet potatoes and beets at the same time if you like on separate racks in the oven. Scroll down to see preparation of beets on Step 1.

Recipe for Balsamic Roasted Sweet Potatoes (will feed four):
3 sweet potatoes (gosh, you could use yams even!)
1 large yellow onion
1/2 cup balsamic vinegar
1/2 cup extra virgin olive oil
2 teaspoons fresh thyme, minced (strip the leaves off the stems and mince leaves)
2 teaspoons fresh rosemary, minced (strip the needles off the stems and mince needles)
2 cloves garlic, minced
Kosher salt and pepper to taste.

Pre-heat oven to 375 degrees. In a large bowl, pour in your 1/2 cup balsamic vinegar. Slowly whisk in extra virgin olive oil. Add thyme, rosemary and garlic. Whisk to combine. Set aside. Peel onion and cut into 1 inch size pieces. Take all the onion pieces and add them to the balsamic mixture. Mix around until all pieces are thoroughly coated. Using a slotted spoon, scoop the onion pieces out of the mixture and place them on a rimmed baking sheet (jelly roll pan). Don't discard the balsamic mixture- you will need it to coat the sweet potatoes. Peel sweet potatoes and cut into 1-2 inch pieces. Try and keep pieces uniform for even cooking. Add sweet potato pieces to the balsamic mixture. Mix around to thoroughly coat each piece. Using a slotted spoon, scoop all sweet potato pieces onto the rimmed baking sheet. Use the slotted spoon to incorporate the onion and sweet potatoes together and to evenly spread them across the surface of the rimmed baking sheet. Season with salt and pepper. Start with a tablespoon of both. You can always add more after roasting. Bake at 375 degrees for 35-40 minutes. Stir the onions and sweet potatoes a couple times during roasting. This helps brown them up evenly. When sweet potatoes are brown on the edges and fork tender, the mixture is done. Remove and season with salt and pepper to your liking. Serve and enjoy!

Recipe for Chopped Salad w/ Roasted Beets (will feed 4-6):
4 smallish-medium beets (any variety)
8 slices bacon
9 oz leafy lettuce such as baby arugula or spring greens
1 large granny smith apple, peeled and diced
Heaping 1/2 cup toasted walnuts, coarsely chopped
4 oz container crumbled gorgonzola cheese

Dressing: Newman's Own Balsamic Vinaigrette or you could use the Light version which is good as well.

1. Preheat oven to 375 degrees. Wearing an apron to protect your clothes from the beet juices, wash and scrub beets thoroughly. When finished, trim the top (the long leafy parts) off all the way down to the actual beet. Now trim the squiggly little root off the bottom. Now you are ready to wrap them in foil for roasting. Wrap them like you would a potato for baking. Just before wrapping with beet and foil are in your hand sprinkle a little kosher salt over the beet with your free hand. When all beets are wrapped with foil place them on a rimmed baking sheet to contain beet juices that will surely leak. I also like to wrap the baking sheet with foil so I have one less thing to wash in the end. Place the baking sheet with beets in your pre-heated 375 degree oven and roast for 35 minutes or until tender. Remove from oven and set aside, allowing them to cool.

The little white bits are kosher salt.

2. In a large skillet, cook bacon over medium to low heat. When done, let bacon slices strain on paper towels.

3. If you were able to buy walnuts that were already toasted, GREAT! If not, here is what you'll need to do: In a small skillet, pour in your heaping 1/2 cup of coarsely chopped walnuts. Turn the heat on to medium. With a spoon or using some wrist coordination, keep the nuts constantly moving so they don't burn. You will smell a toasting smell though, which is what you want. The nuts should be done in a matter of minutes. Remove nuts from skillet and allow to cool on a plate.

4. Take your lettuce and pour it into a large serving bowl.

5. Take your diced apple and pour it over the top of your leafy lettuce.

6. Take cooled bacon slices and chop into large pieces on a cutting board. Add chopped bacon to the lettuce and apple.

7. Take cooled walnuts and add them as well.

8. Add your whole container of gorgonzola cheese.

9. The beets should be cool enough to handle now. Unwrap the beets on a cutting board and discard the foil. Slice beets into wedges (you'll be serving these on the side of the already dressed and tossed salad). Again, be careful as the beet juices are highly pigmented and could potentially stain clothing, etc.

10. You are now ready to toss and dress the salad. I tossed this particular salad with Newman's Own Balsamic Vinaigrette (you can find it on the dressing aisle). It's REALLY delicious and convenient. It also comes in a Light version, which I tried on a caprese salad my good friend, Kelli, made and it was really good as well. Toss the salad with just enough dressing to moisten. Plate and serve the chopped salad immediately with 4-5 beet wedges rested on top or to the side.

I love eating action shots.

Don't forget to enter the GIVEAWAY (click link or scroll down to find it) if you haven't already! Kara and I have loved reading through all your comments....you guys are the bees knees.

images by Briana
salad recipe inspired by one found in House Beautiful mag